Did you know you may automatically merge images/photos from report fields you mark for summary into your final summary documents along with your comments? You may also use summary preferences to specify other information to include, like form and heading labels.
To include images from the report field along with comments:
- In the report writer, click Summary > Preferences.
- In the “Behavior” tab, click the box “Include images in summary”.
- Click OK when done. That’s all there is to it. Now when summary information merges into your final summary document, any pictures from those fields are also included automatically.
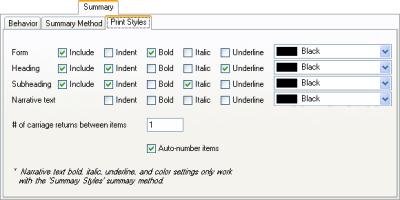
You may also decide whether you wish to include form name, heading, or subheading labels along with the comments when summaries are created:
- In the report writer, click Summary > Preferences.
- Click the summary “Print Styles” tab.
- Mark “include” for the various items you wish to include and set the styles for printing them as desired by clicking on formatting options or adjusting color.
- Click OK when done to save your settings.

After making any adjustments to the Print Styles, use Summary > View Summary to instantly see how they affect the look of summary information for your current report.
Use Summary > View Summary any time while reporting normally to quickly review all information selected for the various summary areas throughout your report. For speed, the location of any included images is represented by an **IMAGE** placeholder within the comment information shown.
For further information about the summary feature in general, including options for marking information for summary and how to customize master documents into which the information merges, check out the expanded information found in the Getting Started Guide for report writer, report writer documentation, and in related online videos. These items are all accessible from within your software HelpDesk side pane.

