This guide explains how to properly install, network, and maintain the 3D Inspection System across a host/server and multiple workstations. It is written for IT professionals but accessible to users with moderate technical skills. We recommend reviewing all information before starting. Consult with 3D support if you have any questions. Information covers:
- Licensing requirements
- Hardware and system prerequisites
- SQL instance configuration
- Host/server setup
- Workstation setup
- Troubleshooting connectivity
Licensing Requirements
Each computer running the 3D Inspection System desktop software requires a license seat.
- The host/server uses one seat (often complimentary).
- Each workstation/client with the software installed uses an additional seat.
- A file server that only stores shared reports (no 3D software installed) does not require a license.
Ensure licensing is compliant before installing on additional machines. 3D Inspection Systems reserves the right to deny future support, activations, or other services or revoke licensing (or pursue other legal actions) where installations are not in compliance with the EULA.
Hardware & System Requirements
Before installation:
- Confirm all machines (the host/server where SQL resides and each client/workstation where 3D will be installed to access the system) meet current 3D Inspection System hardware System Requirements.
- If needed, IT may temporarily elevate user permissions during installation.
- 3D Inspection Systems cannot configure your network for you; your IT team must handle networking, permissions, and firewall settings.
Resetting the Connection String
If a workstation connects to the wrong SQL instance, tenant, or an outdated configuration, reset the connection string:
- Enable “Show hidden items” in File Explorer.
- Navigate to: `C:\Users\[UserName]\AppData\Roaming\3D Inspection System 11\`
- Edit config.ini in Notepad.
- Change node value:
<ConnectionEstablished>true</ConnectionEstablished>to<ConnectionEstablished>false</ConnectionEstablished> - File > Save. Close the file in Notepad.
- Relaunch 3D. The Welcome Wizard will reappear.
This is useful when:
- A workstation is connecting to its own local database rather than to the host/server
- Credentials changed
- A configuration file was copied incorrectly from another device
- To access the Welcome Wizard to establish a fresh connection in the event of another error or issue
Backups
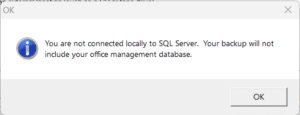
- Backups must be performed on the host/server, not a workstation. Full backups must use a local connection to the SQL database to include Office Management information. Workstation backups or host/server backups misconfigured to not use a local connection will omit Office Management data and display this type of message:
- Production data may be missing (if the shared data folder is not properly assigned or mapped on the computer making the backup), but no message will occur.
- Always verify that backup
.zipfiles open correctly. - Although you may opt to make backups separately using SQL or other tools, assistance with these is outside the scope of 3D support.
General Notes About SQL & Networking
SQL Instance
3D Inspection System 12 uses a SQL 2022 instance named THREED2. Example SSMS connection: COMPUTERNAME\THREED2
Do not include the instance name when selecting the server in the 3D Welcome Wizard.
Installing SQL using an installer directly from Microsoft will not create the proper named instance 3D uses.
SQL Error 26
If you receive SQL Error 26 when creating a database:
- Check for the folder:
C:\Program Files\Microsoft SQL Server\MSSQL16.THREED2 - If missing, review Windows Event Logs or the SQL Setup log for permission or policy issues.
- Use the Event log or C:\Program Files\Microsoft SQL Server\160\Setup Bootstrap\Log\Summary.txt to troubleshoot the failure.
- Windows 11 Disk Sector Issue: Some NVMe/SSD drives expose physical sector sizes > 4096 bytes, which SQL Server cannot use, rendering it unable to start. Microsoft only supports 512 bytes and 4 KB sector sizes on Windows 11 (whereas Windows 10 emulated supported values). To check for this issue, use a cmd prompt as admin to run
fsutil fsinfo sectorinfo C:If values for PhysicalBytesPerSectorForAtomicity or PhysicalBytesPerSectorForPerformance exceed 4096, apply Microsoft’s workaround: https://learn.microsoft.com/en-us/troubleshoot/sql/database-engine/database-file-operations/troubleshoot-os-4kb-disk-sector-size?tabs=registry-editor Afterward, reboot Windows, uninstall 3D, and reinstall. If issue persists, consider resetting Windows and applying the fix prior to installing 3D.
Authentication
- Windows Authentication is recommended (especially on domain-joined networks). Your IT team may find it convenient to install and use SQL Server Management Studio (SSMS) on the host/server machine containing the SQL database to add client/workstation users to be in a proper domain.
- SQL Authentication is supported but not preferred. If using TCP/IP with SQL Authentication, please contact 3D support for default credential information, or adjust credentials using SSMS for connecting client machines. If using SQL Authentication, record any credential changes—3D support expects defaults unless told otherwise.
- The host/server should connect to SQL either using Windows Authentication or use “(local)” as the computer name with SQL Authentication (e.g. if a different user profile will connect to the database than where originally installed), as using a specific computer name on the machine hosting the database may prevent it from updating to future versions of 3D as well as including the database in backups made from 3D on the local machine (see Backups information above).
Updating 3D
Always update in this order:
- Host/server
- All workstations
All machines must run the same version.
Consult your IT team about network or domain setup. 3D Inspection Systems support can advise regarding setup on a local machine where the database is located, or regarding specific connection settings for 3D if SQL Server Management Studio (SSMS) installed on a client/workstation is able to successfully connect to the database instance on the host/server directly, outside of 3D. SSMS is useful for your IT team to confirm and troubleshoot connectivity through the firewall/ports.
STEP A — Host/Server Setup
Use the appropriate scenario to set up host/server computer.
A1. New Installation (new company setup)
- Install and activate 3D on the host/server as appropriate. Use Activate Later to defer activation and continue initial setup. Registered user may actually activate after verifying setup is working.
- Launch 3D and use the Welcome Wizard → Set Up New Computer to create the database. Note: Users may later adjust company and inspector information or restore a backup. If you get a SQL Error 26, please see tips at the beginning of this guide.
- Share the default data folder with the network:
\Documents\3D Inspection System 11\(or use another location by (a) relocating the folder to another drive letter/folder accessible location, (b) using 3D Actions side pane to switch to Report Writer, then Preferences → Preferences, File locations tab “Location of data files” meatballs menu to select new location of a mapped drive letter path, (c) close and reopen 3D). - Configure SQL network access for protocol and port access to allow THREED2 to connect through the firewall.
- Enable TCP/IP for THREED2
- Open port 1433 (SQL Server)
- Open UDP 1434 (SQL Browser)
- Ensure SQL Browser service is running and/or set Automatic
- Two firewall rules may be needed: one for data traffic and one to help other computers “find” THREED2. See also https://learn.microsoft.com/en-us/sql/database-engine/configure-windows/server-network-configuration?view=sql-server-ver16 (Pro tip: Name your firewall exceptions for easy recognition, e.g. “SQL – THREED2 Data” and/or “SQL Browser Service” as applicable)
- Proceed to Step B1 to configure workstations.
- Perform regular backups from the host/server using File → Backup All Files. Verify created 3dbackup .zip files and store safely. 3D support does not assist with backups made by other means.
A2. Upgrading an Existing Installation (existing company)
- Create a full backup. Use Office Management File > Backup All Files. If any issue is experienced during backup, or if the backup creates multiple 3dbackup .zip files for the backup date, please contact support for advice. Open each 3dbackup .zip files created to confirm the file(s) is viable.
- Uninstall the old version from Windows Installed apps.
- Install the new version of 3D Inspection System using default wizard options.
- Launch 3D and allow time for database migration during initial launch.
- Reconfigure SQL firewall rules if upgrading from version 12.3 or earlier to allow the new THREED2 instance to connect through the firewall. Refer to Step 4 in preceding section A1 above. Tip: If present, use prior THREED instance rules as a model, and then optionally disable services and exceptions for prior THREED instance.
- Proceed to Step B2 for workstation updates.
A3. Moving to a New Host/Server (existing company)
- Create a full backup on the old server. Use Office Management File > Backup All Files. If any issue is experienced during backup, or if the backup creates multiple 3dbackup .zip files for the backup date, please contact support for advice. Open each 3dbackup .zip files created to confirm the file(s) is viable.
- Install 3D on the new host/server and activate as appropriate. Use Activate Later to defer activation and continue initial setup. Registered user may actually activate after verifying setup is working.
- Use the Welcome Wizard to create a temporary database using “Set Up New Computer” option. Enter minimal information such as company and inspector name only as placeholders. If you get a SQL Error 26, please see tips at the beginning of this guide.
- Transfer and restore your 3dbackup.zip (made in step 1) via Office Management → File → Restore from Backup. IMPORTANT: If backup was made in a prior version 12.3 or earlier, we recommend NOT restoring “Preferences” which would be configured to attempt to connect to an old or non existent Instance.
- Configure SQL network access (TCP/IP, ports, SQL Browser). Refer to Step 4 in preceding section A1 above.
- Proceed to Step B3 to reconnect workstations.
- Activate 3D on the new server and resume regular backups using File > Backup All Files.
STEP B — Workstation Setup (SQL)
Once 3D is working on the Host/Server, set up connected Client/Workstation computers. Note: Alternatively for simple remote usage, Windows App (RDP) or similar might be used without installing 3D on additional machines, or for concurrent use to “remote directly into” client/workstations where 3D has been installed and connected to the host/server data. Networking requires two components:
- SQL THREED2 instance (Office Management)
- Shared data folder (reports, forms, documents, etc.)
If the networked computers are not domain-joined or you cannot use Windows Authentication, please contact 3D support for assistance with default credentials for SQL Authentication or use SSMS to adjust user credentials in THREED2. If using SQL Authentication, record any credential changes—3D support expects defaults unless told otherwise.
After the appropriate Step A scenario is completed for Host/Server setup, use appropriate or matching scenario steps here to set up Client/Workstations.
B1. New Workstation Installation (new, reset, replacement)
- Verify the host/server version (Help > About 3D) is the same version you are installing on the client/workstation.
- Install 3D and activate as appropriate. Use Activate Later to defer activation and continue initial setup. Registered user may actually activate after verifying setup is working.
- Use the Welcome Wizard to create a temporary local database (to confirm SQL works). Tip: Use workstation name as Company for easy ID, and an Inspector name to proceed. If you get a SQL Error 26, please see tips at the beginning of this guide.
- Switch to Report Writer and open Preferences → Preferences → File Locations → open the user/temp folder. Leave File Explorer open but Cancel Preferences window and close 3D. Use File Explorer to delete config.ini.
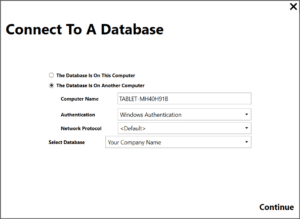
- Relaunch 3D and use Welcome Wizard option: Connect to local or network SQL → The Database is On Another Computer
- Enter the server’s Computer Name, Authentication type, and reselect a Network Protocol (default or otherwise).
- Select Database to choose the company and Continue. If you cannot continue, see Troubleshooting tips below
- Close and reopen 3D and confirm Office Management data matches the host/server.
- Proceed to Step C (data folder mapping).
B2. Upgrading an Existing Workstation (old to new version of 3D)
- Ensure the server is already upgraded (Step A scenarios), and appropriate firewall exceptions made for THREED2 instance.
- Uninstall the old version of 3D from Windows Installed apps
- Install the new version.
- Launch 3D and confirm it reconnects. Add a new job in 3D on the server and verify it shows in 3D on workstation (refresh/switch Views on workstation). If so, you should be all set and may skip additional steps.
- If it does not reconnect OR the new job does not appear:
- On workstation, reset the config.ini connection string (Refer to beginning of networking documentation)
- Relaunch and reconnect using the Welcome Wizard:
- Connect to local or network SQL → The Database is On Another Computer
- Enter the server’s Computer Name, Authentication type, and reselect a Network Protocol (default or otherwise).
- Select Database to choose the company and Continue.
- Use SSMS to verify SQL connectivity and troubleshooting tips below if needed.
B3. Reconnecting Workstation After Moving to a New Server
- Reset config.ini connection string (Refer to beginning of networking documentation)
- Relaunch and use the Welcome Wizard to connect to the new server:
- Connect to local or network SQL → The Database is On Another Computer
- Enter the server’s Computer Name, Authentication type, and reselect a Network Protocol (default or otherwise).
- Select Database to choose the company and Continue.
- If Select Database or Continue never appears, client/workstation is unable to access the THREED2 instance on the host/server. Return to step A1 (4) to confirm and adjust firewall or other settings on new server.
- Verify connectivity to correct company database by creating a job on the server and refreshing the workstation to view it.
- If the data folder location also changed with new server setup, proceed to Step C.
Troubleshooting TIPS for SQL Connectivity
If the company database does not appear or spinner continues:
- Confirm the server’s Device Name (System → About). Use that Computer Name in the wizard.
- Test SQL connectivity using SQL Server Management Studio from the workstation.
- If SSMS cannot connect, adjust firewall rules, SQL Browser settings, or authentication.
- Temporarily disable the firewall or security to confirm whether it is blocking SQL discovery. Re-enable afterward with needed exceptions.
- Once SSMS can connect, 3D should connect using same settings. 3D Support can assist further once SSMS on the client/workstation is connecting to THREED2 on the server.
Step C — Networking the Shared Data Folder
Step C focuses on the second half of networking 3D Inspection System: ensuring every workstation has access to the shared data folder that contains templates, reports, forms, documents, actions, and other customizable resources.
This step assumes:
- The host/server is already configured (Step A)
- Each workstation is already connected to the SQL database (Step B)
- You know the location of the shared data folder (default or relocated)
C1. Identify and Share the Data Folder on the Host/Server
1. Locate the Data Folder
By default, on the server the data folder is stored in: \Documents\3D Inspection System 11\
If the folder was moved earlier (e.g., to a file server or alternate drive), use that location instead. (Tip: Verify or open the location on the server by opening 3D there and using Report Writer > Preferences > Preferences, File Locations tab to note or open the data folder.)
2. Share the Folder
On the host/server:
- Right‑click the 3D Inspection System 11 folder
- Select Properties → Sharing → Advanced Sharing
- Enable Share this folder
- Assign a clear share name (e.g.,
3DData) - Ensure users have Read/Write permissions
This allows all workstations to access the same forms, templates, and production files.
C2. Map the Shared Folder on Each Workstation
Each workstation must map the shared folder to a consistent drive letter (e.g., Z:). This ensures 3D can locate shared resources reliably.
Steps:
- Open File Explorer
- Select This PC → Map Network Drive
- Choose a drive letter (e.g.,
Z:) - Enter the shared path, such as: \\SERVERNAME\3DData
- Check Reconnect at sign‑in
- Authenticate if prompted (domain or local credentials)
- Once mapped, the workstation will treat the shared folder as a local drive.
If the workstation cannot access the mapped drive:
- Confirm the server folder is shared
- Verify NTFS and share permissions
- Ensure the workstation can ping the server
- Check firewall rules for file sharing (SMB)
- Confirm the mapped drive reconnects after reboot
C3. Configure 3D to Use the Mapped Drive
On each workstation:
- Open 3D Inspection System
- Switch to Report Writer (Actions pane)
- Go to Preferences → Preferences → File Locations
- Under Location of data files, select the mapped drive path
- Close and reopen 3D to apply changes
This ensures all workstations use the same shared data folder rather than local copies.
Do not use a UNC path (i.e. \\server..) in Preferences to access a drive share. Proper management of temp folders and other program functions require mapped drive locations for stability and operational speed. Unmapped drives that unexpectedly disappear in Windows could result in data corruption.
Note that the “Location of user and temporary files” folder should remain a local location on the workstation, specific to that user profile, allowing workstation specific files and settings and temporary folders to be more efficiently accessed locally and avoid conflicts with other profiles.
D. Verify Full Connectivity & Data Synchronization
After mapping and configuring:
- Open Office Management on the server
- Create a new job. Use the job to Start a new Inspection. Enter a test sentence, save and close.
- On each workstation, refresh or switch views
- Confirm the job appears. Select and verify Open an Existing Inspection reopens the report file created on the server.
If it does, both SQL and data folder networking are functioning correctly.
If 3D still shows incorrect or missing data:
- If Office Management job is missing: Reset the connection string again if needed (config.ini method)
- If Report is missing: Reopen Preferences → File Locations. Ensure the path points to the mapped drive, not a local folder
Backup Recommendations
Backups must always be performed from the host/server, not from workstations:
- On the host/server, open 3D Inspection System
- Select File → Backup All Files
- Confirm the backup completes without warnings
- Open the resulting
.zipfile(s) to ensure it is readable - Store backups safely in accordance with your IT policies
If backups are missing production reports and data, workstation(s) may be pointing to a local data folder instead of the shared one. Or backup may have been produced from a workstation rather than the server.
3D Support can only assist with recovery or data transfer using good 3dbackup.zip files. If you choose to backup SQL and data files by other means, 3D support does not offer assistance with those items.
When to Contact 3D Support vs. IT
Contact your IT administrator for:
- Network configuration
- Firewall and port issues
- Domain authentication problems
- SMB/mapped drive issues
Contact 3D Inspection Systems support for:
- SQL Authentication configuration if Windows Authentication is not used
- Welcome Wizard connection settings (assuming connectivity is working in SSMS)
- Preferences settings in 3D (assuming appropriate drives are shared and mapped)
- Licensing questions
- Backup/restore issues
RDS / Terminal Services Note
3D Inspection System is not multi‑session aware and is not supported for use in Remote Desktop Services (Terminal Services) environments. Launching the software under different user profiles on the same server may trigger repeated “repair” actions and activation prompts, because the application is not designed for concurrent profile‑based execution.
If remote access is required and only one user at a time needs the software, you may use a single shared Windows profile to avoid profile‑related conflicts. Multiple users can access the same profile when needed—just not simultaneously.
Concurrent use recommendations
For true multi‑user, concurrent operation, each user should run 3D on a separate workstation or VM, consistent with the number of purchased license seats. Concurrent use on the same machine or server requires appropriate licensing under the EULA.
If you prefer not to maintain multiple physical PCs, you may be able to use VMs with Personal Host Pools (Personal Desktop Assignment) to isolate user profiles. Technologies such as FSLogix App Masking/Redirection, symbolic links, or application virtualization may help manage C:\ProgramData dependencies. 3D cannot support or troubleshoot these configurations, but they can allow each VM/workstation to maintain separate profiles and user/temp folders, while connecting to the shared SQL instance and shared and mapped data folder/file server.
Mobile workflows for inspectors
For organizations with multiple inspectors, the 3D Mobile Inspector apps often provide the simplest workflow without requiring additional licensing or complex networking. Inspectors can complete field reports and return them to the main office.
If an inspector needs to finalize reports after returning them:
- They may remote into a networked workstation running the desktop software, or
- Use a free, non‑timed evaluation copy of 3D on their own computer to edit reports stored on a shared file server or other shared location.
For licensing or workflow questions, Contact 3D support or sales.
