


3D Mobile Inspector FREE companion app available for US, CAN, AU, and NZ may be installed on multiple compatible devices. You may demo the app interface without Cloud3D Services, but must activate your personal Cloud3D Services account to transfer real inspections.
3D Mobile Inspector Videos
Mobile app related articles
To get started (each step outlined on this page below):
A. Install 3D Mobile Inspector on your compatible phone or device.
B. Demo the interface!
C. Activate your personal Cloud3D Services account. Wait for your confirmation email.
D. Use Office Management to transfer reports to/from your device.
A. INSTALL MOBILE APP - System Requirements
ANDROID 5.0+ Search Play Store for "3D Mobile Inspector" or "3D Inspection Systems, Inc": https://play.google.com/store/apps/details?id=com.x3dInspectionSystems.x3DMobileInspector More Store Information
iOS 10.3.3+ (iPhone or iPad): Search App Store for "3D Mobile Inspector": https://apps.apple.com/us/app/3d-mobile-inspector/id1376343298 More Store Information
WINDOWS 10/11 TABLETS: Search Microsoft Store for "3D Mobile Inspector" in Apps: https://www.microsoft.com/en-us/p/3d-mobile-inspector/9nqqnt0wlwlx More Store Information. Your desktop program may also be installed on the same computer if it meets desktop program requirements; Cloud3D Services transfers the reports to and from your desktop program and the mobile app. Can't find app in Store?
B. DEMO THE 3D MOBILE INSPECTOR INTERFACE
 After installing, open a Sample report to demo the interface. All devices may insert landscape and portrait photos, but larger tablets main screen can rotate, whereas smaller phone sized devices use portrait.
The Sample residential report allows you merely to demo the interface. 3D Mobile Inspector with your personal Cloud3D account will use your OWN customized forms from your main software.
Questions? Ask us here: http://www.3dinspection.com/tech-support/index.html
Feature Highlights:
- Use ANY custom forms from your 3D Inspection System desktop software, residential, commercial, etc.
- Insert photos directly from camera right where they belong, or insert from the gallery.
- Bookmark to jump back to an item in mobile or on your main computer.
- Replicate items, rooms, or components while inspecting.
- Before leaving the inspection, review non-inspected items, or preview the report or summary items.
C. CLOUD3D SERVICES

Learn more about Cloud3D Services
Activate Cloud3D Services:
1. Click Here to sign-up for Cloud3D Services. You or your employer must have an active subscription to use Cloud3D Services. If you have not yet purchased the software, contact sales about your option for a limited trial offer.
2. 3D Inspection Systems will email you when your account is enabled, after which you may begin using it.
Login with your User name (Activation ID/Account ID email used during initial activation of your desktop software) and password when sending or retrieving reports, or the login provided to you by your employer if you belong to a multiple inspection firm.
Multiple Inspection Firms: Where official additional Branch copies have been obtained by employers, the inspector may sign up and use their independent Cloud3D Services account to directly upload and retrieve inspections. Otherwise employers MUST add and manage the inspector logins from the report writer Preferences Cloud3D Services tab in the main software using the master login, including for the owner/operator if also an inspector. A main office master login should NEVER be used to log in on a mobile device and never provided to any inspector. Each inspector using Cloud3D Services should ONLY use the sub-account login assigned to them on their mobile device to avoid accidentally overwriting others' reports. Inspector logins may be updated, changed, or managed by the main office at any time. Inspections should always be created from and converted back to the same main office controlled computer, which generally would use the master login, which may also be "remembered" without revealing it, if inspectors are granted access to use the desktop software. See Instructions on how to Manage Sub-Accounts
D. USE WITH 3D INSPECTION SYSTEM DESKTOP SOFTWARE
*Cloud3D Services must be enabled (see step C. above)
Send a report to your device:
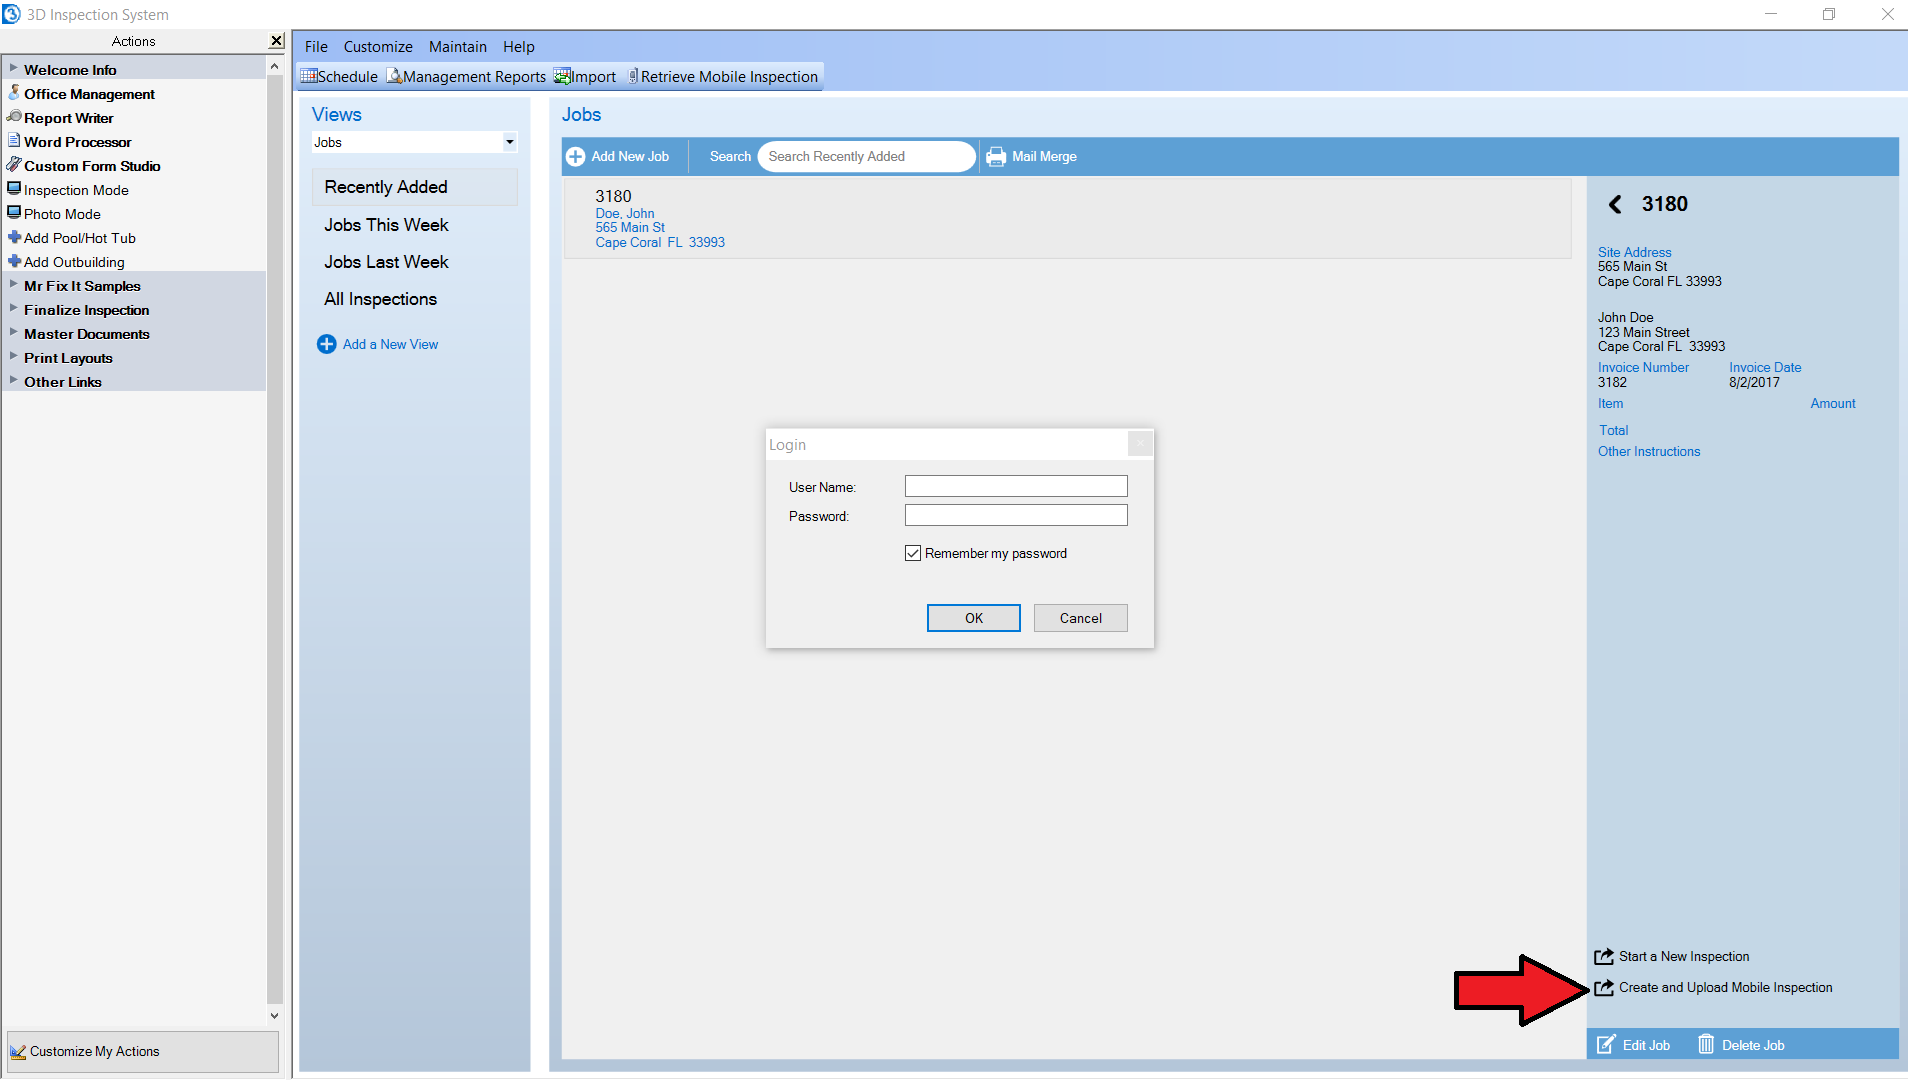
1. Add an assign your job in Office Management to the desired inspector. After saving the job, select it and use the right pane activity to "Create and upload mobile inspection".
2. Select a job name assigned to the inspector and the forms for the report, and login. The inspection and its date and time uploads for handy viewing on the mobile device.
Use a report on your device:
1. In 3D Mobile Inspector, login with your Cloud3D ID and password your office assigned to you. NOTE: Whenever there are multiple inspectors each inspector MUST use their own personal sub account login managed and assigned to them by the main office to retrieve and return inspections. To avoid data loss or overwriting, mobile logins should never be shared.
2. Tap the desired Pending report(s) and Download.
3. Open and Inspect! See Overview video
4. When finished with your report, Back out of the report to the inspection listing.
5. Tap the inspection on the device and Upload. "Inspections on the server" shows the current status of your mobile reports.
Retrieve the report back into your regular PC 3D Inspection System:
1. In Office Management toolbar, tap "Retrieve Mobile Inspection".
2. Select the "Completed" report and OK to convert it into a regular inspection in the desktop program.
OTHER TIPS AND NOTES
Special Note about limited graphical forms (WDO, Wind Mitigation, HUD, etc.): 3D Mobile Inspector works exceptionally well for narrative style forms used for most inspections. However special graphical forms that print a special pre-designed hard-coded layout have these restrictions and caveats. Since 3D Mobile Inspector does not know a form is designed to print graphically, do not use the copy heading or subheading option because graphical forms can only print existing fields on the final printout. Only insert photos into any fields specifically previously designated to accept them, as they will not otherwise work. Only insert a single photo into each such designated photo field. Where a photo section is available in a graphical form, usually there are multiple fields for inserting photos separately. None of these restrictions apply to regular narrative style form groups. (To verify whether a particular form group is graphical or not, switch to the regular Report Writer and click File > New Inspection to view your forms groups. White icons in the listing are narrative; Yellow icons are graphical)
Notes about Images: Images may be inserted directly from the camera or gallery by long pressing the camera icon. We don't recommend embedding more than 100 photos per report to ensure reports don't become excessively large to transfer.
Notes about added comments: Tap a comment field below a subheading label to add additional manual comments that will print following selected narratives. For a one-time comment simply add a desired save. For a comment you'd like to add for future inspections use the menu option to save as a new narrative. Note that if you use the menu to Import existing selected narratives to edit them further, any rich text formatting can't be retained because the mobile device doesn't support the same libraries as desktop. However narratives remaining selected on the main app menu will import original master form comment, including any rich text formatting (colors, bolding, italics, etc) in your final report since it does so at retrieve time. Therefore if it's important to you to retain particular original style formatting and yet make further edits to a standard comment, you may wish to just bookmark it, and then flip through bookmarks after retrieval to make your final edits to those comments.
Note about summary: If your forms are set to automatically use Ratings to mark items for summary, the field is automatically flagged for summary when you tap the appropriate rating(s). However if your forms are not set to use ratings for summary, then you may manually flag a field for summary by tapping to edit comments and selecting the desired summary area there. Any narratives pre-set for summary in such forms also do so automatically when selected.


 Need Support